Kar4es (обсуждение | вклад) м (перевод) |
Kar4es (обсуждение | вклад) м (Kar4es переименовал страницу Guide to Atmospherics в Руководство по атмосферике) |
(нет различий)
| |
Версия от 07:43, 24 июля 2024
Это руководство по Atmospherics. При правильной настройке Атмосия может поддерживать станцию в рабочем состоянии практически в любой чрезвычайной ситуации. При неправильной настройке это в лучшем случае пустая трата места, а в худшем - откровенная пожароопасность.
Мы пройдем через это шаг за шагом, играя с различными концепциями. Сначала мы обсудим более практические аспекты, затем перейдем к синтезу газообразных веществ и, наконец, к тому, зачем и как нужна атмосфера. Прочитав это руководство, вы узнаете, как превратить Атмос из пустой траты места в действительно полезное дополнение. Мы пройдемся по всем видам теории, так что это может быть непросто, но это также гарантирует, что вы будете точно знать, как и, что более важно, как Атмос работает так, как он работает, и вы будете готовы к любым ситуациям.
Так же посмотрите:
Атмосферика 101: базовая теория, компоновка и хранитель воздуха
У тебя, дорогой атмосферный техник, есть одна главная задача: поддерживать на станции не слишком жаркую, не слишком холодную атмосферу, давление и возможность дышать. Вы можете синтезировать сложные газы, но если вы нарушите эту основную обязанность, вы не станете хорошим атмосферным техником.
Стандартные трубы
В наши дни трубы больше не имеют определенного направления, в котором они соединяются. Обычные трубы автоматически соединяются с соседними трубами того же цвета и слоя. Трубы Omni (серого цвета) соединяются со всеми цветами на одном слое. Это очень важно помнить, так как небрежное размещение труб может привести к случайному соединению между ранее отдельными трубами. Эту функцию принято называть "умными трубами". Всем трубам и трубным устройствам можно присваивать цвета, и даже большие атмосферные машины также можно настраивать по цвету.
В интерфейсе Rapid Pipe Dispenser (РПД) вы заметите несколько зеленых кнопок со стрелками слева. Их можно отключить, чтобы ограничить автоматическое соединение труб в определенном направлении для размещенных вами труб. Это очень удобно при работе в ограниченном пространстве, когда нет другого способа избежать прохождения двух труб одинакового цвета друг мимо друга. Нажатие на кнопку с кругом в центре вернет ограничения к автоматическому соединению по умолчанию.
Если вам нужно соединить две трубы разного цвета, вместо обычной трубы можно использовать цветной адаптер. Однако труба Omni будет работать отлично, как и любое устройство, настроенное на omni, например насос или клапан.
Атмосферные устройства
Это будет раздел, в котором подробно описаны общие функции и некоторые особенности различных труб, насосов и других устройств. Некоторые детали будут упущены, но они послужат основой. Первый случай, когда устройство сталкивается с уникальной механикой, будет объяснен более подробно.
 Digital Valve
Клапан, который открывается при нажатии и соединяет два трубопровода, которые при этом разделяет. В отличие от насосов, он не испытывает задержек при передаче газа. По сути, он действует как труба. Имеет объем 200л с одной стороны и 200л с другой. Им могут пользоваться как углеродные мобы, такие как люди, за исключением ксеноморфов, так и синтетики (например борги или ИИ).
 Pressure Valve
Активируемый клапан, который пропускает газ, если давление на входе выше заданного.
 Temperature Gate
Это устройство работает как клапан, который пропускает газ только в том случае, если заданная температура ниже установленной, до предела 4500K. Это поведение можно изменить с помощью мультитула, пропуская газ только в том случае, если температура выше установленной.
 Manual Valve
Действует так же, как и цифровой клапан, однако ручной клапан не позволяет синтетикам управлять им.
 Pressure Pump
Странный случай. Как и все насосы, он разделяет соединенные трубопроводы, если их больше ничего не соединяет. Максимальное давление составляет 4500 кПа. Все насосы работают, перекачивая содержимое внутри себя на другую сторону, то есть 200л с одной стороны и 200л с другой. Любой насос не может перекачивать газ, которого в нем нет, что означает, что очень большие соединенные трубопроводы будут иметь меньшую скорость перекачки. Напорные насосы работают, постепенно наращивая давление до заданного уровня за такт. Из-за этого насосы замедляются при приближении к заданному давлению, и через очень долгое время давление не будет полностью соответствовать заданному, но будет очень близко к нему.
 Volume Pump
Объемный насос похож на напорный, но работает по-другому. Он имеет предел давления 9000 кПа. Однако это ограничение срабатывает только тогда, когда давление в выходном трубопроводе превышает 9000 кПа. Насос будет работать, если давление в выходном трубопроводе ниже 9000 кПа, даже если результирующее давление в результате этого действия будет намного выше 9000 кПа. В отличие от напорного насоса, этот насос работает на основе L/s. Он также имеет объем 2х200л, поэтому, изменяя число, вы выбираете, какой объем насоса будет перекачан на другую сторону. Поскольку его максимальная скорость составляет 200 л/с, он всегда будет обгонять и подавлять напорный насос. Его можно разогнать с помощью мультитула, что снимет ограничение выходного давления. Однако если на плитке, на которой находится насос, нет ничего, что могло бы помешать ему протечь, например стены, он выпустит газ в атмосферу.
 Passive Pump/Gate
Они представляют собой комбинацию насосов и клапанов. Они работают до заданного давления, максимум 4500 кПа. Как и клапаны, они не могут сделать больше, чем уравнять давление в двух соединенных трубопроводах. Однако они работают только в одну сторону, а не смешивают газ между двумя трубопроводами, как это делают клапаны. Думайте о них как о насосе, который выравнивает давление только между двумя трубопроводами.
 Unary Vent
В зависимости от настроек воздушной сигнализации в помещении, в котором находится вентиляция, она будет откачивать газ. У воздушной сигнализации есть две настройки: внешняя или внутренняя. Внешняя работает, заставляя воздухоотводчик закачивать газ из подключенного к нему трубопровода в помещение до тех пор, пока в помещении, а точнее, в плитке, не установится заданное давление. Максимальное давление, которое вы можете настроить для внешнего, составляет 5066 кПа, и оно замедляется при приближении к установленному пределу, как это делают насосы под давлением. Внутренний работает, закачивая газ в помещение из трубопровода, пока установленное давление не совпадет с давлением в подключенном трубопроводе. Примеры: вентиляция, настроенная на Внешнее 200, будет закачивать газ в помещение до тех пор, пока давление не достигнет 200 кПа. Отвод, установленный на Внутренний 300, будет закачивать газ в помещение до тех пор, пока давление в подключенном трубопроводе не станет 300 кПа, независимо от давления в помещении. Таким образом, Внутренний 0 всегда будет качать в полную силу. Этого же эффекта можно добиться, отключив и Внешний, и Внутренний. У воздухоотводчика есть максимальная скорость, с которой он может качать газ, даже если он находится под большим давлением.
Следует отметить, что вентиляция может также всасывать газ, как и скруббер, если настроить ее в воздушной сигнализации. Следует также отметить, что он делает это быстрее, чем скруббер, но он не может всасывать газы в формате 3x3, что означает, что он теряет в скорости, когда дополнительная площадь имеет значение, а давление низкое. Вентиляция не имеет ограничений по давлению при всасывании газа, что можно использовать в уморительных целях.
 Passive Vent
Вентиляция без питания, которая уравнивает внутренние и внешние газы. Считайте, что это просто открытая труба в атмосферу. С ней нельзя взаимодействовать и ее нельзя закрыть. Давление в нем также не ограничено, как и в других вентиляциях, что открывает возможности для интересных махинаций.
 Injector
Инжектор похож на вентиляцию тем, что подает газ на плитку, на которой находится. Однако он не управляется воздушной сигнализацией, а работает вручную. Он также работает в единицах л/с, как и объемный насос. Также как и объемный насос, он работает быстрее, чем его кузен, основанный на давлении, - вентиляционное устройство. У него нет максимального изменения давления в секунду, как у вентиляции, и он всегда будет опережать ее. За это приходится платить контролем, который дают вентиляции.
 Scrubber
Газоотсасывающий кузен вентиляции, который всасывает газ в подключенный трубопровод. Скрубберы работают с помощью подключенной воздушной сигнализации. Они всасывают только тот газ, который находится на их плитке, если только вы не установите их диапазон на Expanded, в этом случае они будут всасывать газ 3x3. Если установить для них режим "Сифон", они будут всасывать любой газ. Если скраббер не работает в режиме сифона, вы можете выбрать определенные газы, которые он будет всасывать в свой трубопровод. Чем больше газов выбрано для скраббера, тем больше потребляется энергии. Скруббер имеет предельное давление 5000 кПа и не будет всасывать газ, если давление в подключенном трубопроводе находится на уровне или выше этого значения. В отличие от вентиляции, которая не имеет ограничений.
 Heat Exchanger
Поставьте два таких теплообменника рядом, лицом друг к другу, и они уравняют температуру находящихся в них газов. Теплообменник не является частью (более распространенной) системы теплообменных труб.
 Temperature Pump
Это позволит 'перекачивать' температуру с одной стороны на другую. Обратите внимание, что горячая сторона должна быть обращена к холодной, чтобы это работало. Это работает аналогично теплообменнику, но занимает меньше места и работает только в одну сторону. Значок обманчив, убедитесь, что он ориентирован правильно.
 Filter
Фильтр - это первое устройство, которое соединяет 3 трубы. Его можно настроить на любое количество газов, и он будет сбрасывать их в ту сторону, в которую указывает стрелка. Все газы, которые не выбраны, будут идти прямо вперед, так как стрелка направлена в одну линию. Если установить значение "Ничего", то все газы будут проходить по прямому пути. Фильтр работает в л/с и поэтому не испытывает замедлений, связанных с давлением, однако его максимальное давление составляет 4500 кПа. Когда давление на обоих выходах составляет 4500 кПа или выше, фильтр не будет работать, не пропуская газ. То есть, как на прямой, так и на ответвлении давление должно быть меньше 4500 кПа.
 Mixer
Mixer
Для работы смесителя, как и для фильтра, требуется 3 соединения. Смеситель смешивает два входящих газа, используя соотношение, введенное пользователем, начиная с 50/50. Узел 1 - это вход на прямой линии с выходом, узел 2 - ответвление по отношению к выходу. Для работы оба входа должны иметь газ, если только сторона с газом не установлена на 100%, в этом случае он будет работать и пропускать только эту сторону. Основан на давлении, с соответствующими свойствами. Максимальное давление также составляет 4500 кПа. На смешивание влияет температура в соответствии с законом идеального газа. Если одна из сторон входа более горячая по сравнению с другой, она будет пропускать меньше газа этой стороны в мольном соотношении. Если не выравнивать температуры, это приведет к искажению соотношения, поэтому, если вам нужна точность, убедитесь, что они равны.
 Heat Exchange pipes
Функционирует как обычная труба, но при этом пытается выровнять температуру между трубой и пространством, в котором она находится. Это основано на теплоемкости, которую можно найти на этой странице. Более высокая теплоемкость означает, что газ впитывает больше энергии, а значит, лучше охлаждает в холодное время и лучше нагревает в жаркое. Эти трубы обычно используются в установках суперматерии, чтобы охлаждать теплоноситель с помощью этих труб в космосе. Однако, разумеется, их можно использовать и для нагрева. Потеря эффективности составляет 10K. Космос имеет температуру 2,7К, но теплообменные трубы охлаждают газ до температуры около 22,7К.
 Heat Exchange Junction
Они используются для перехода от обычных труб к теплообменным трубам. Они должны находиться между трубой, насосом и т. д. и теплообменной трубой, чтобы газ действительно передавался между двумя различными видами труб. Хотя эта труба частично похожа на теплообменную, она не выравнивает температуру так, как это делают теплообменные трубы. Она только выглядит так, поэтому ее можно без опаски подключать к любой трубе в обычной комнате.
 Layer Adapter
Соединяет 5 различных слоев трубопроводов. Для большинства станций красная сеть скрубберов будет находиться на слое 2, а синие трубы подачи воздуха - на слое 4. По умолчанию используется слой 3. Трубы на разных слоях не взаимодействуют друг с другом.
 Atmos Meter
Эти полезные устройства, обычно прикрепляемые к трубам, позволяют считывать и изучать данные о давлении и температуре содержимого внутри трубы. С первого взгляда можно заметить, что внешний вид самого измерительного прибора изменяется в зависимости от указанных значений: цвет полоски меняется в зависимости от температуры, а длина полоски увеличивается в зависимости от более высокого давления. Индикаторы также будут заполняться в зависимости от величины давления.
Канистры
В них можно переносить газы. Однако будьте ОЧЕНЬ ОСТОРОЖНЫ с ними, когда имеете дело с горячими газами или экзотермическими реакциями (например, смешивание продуктов горения или даже просто образование фреона), так как они имеют ограничения по давлению и температуре.
Каркас канистры можно сделать, используя 5 железа, а затем дополнить его еще 5 железом. Предельное давление в канистрах составляет 500000 кПа, а предельная температура - 10000К.
Канистры оснащены щитом, который при включении не дает газам внутри канистры повредить ее, позволяя создавать чрезвычайно высокое давление и температуру, пока есть энергия. Чем выше температура и давление внутри, тем выше мощность ( пик должен быть около 25 кВт). Питание будет осуществляться от ближайшего АПЦ, в противном случае будет использоваться внутренняя батарея.
Элементы питания можно заменить, открыв крышку канистры с помощью отвертки и вынув батарею с помощью лома.
Стационарные резервуары
Это неподвижные танки. Их можно сделать, изготовив каркас танка из 4 листов пластали, а затем наложив на него 20 листов материала по вашему выбору. Их объем составляет 2500 л, а предельное давление по умолчанию - 20000 кПа. Предельное давление зависит от модификатора материала: стекло дает 2000 кПа, а пласталь - 30000 кПа.
Полезные советы
Скрубберы, вентиляция, инжекторы, клапаны, насосы, фильтры и смесители можно безопасно открутить, не выпустив на плитку. Особенно клапаны служат прекрасной альтернативой обычной прямой трубе, если вы хотите быть более безопасными при работе с горячим газом.
Большинство предметов и машин атмосферии можно эксплуатировать с помощью CTRL+click и ALT+click. CTRL+click включает и выключает, ALT+click максимизирует работу.
Функция Panic Siphon на воздушных сигнализациях отключает все вентиляционные отверстия и устанавливает скрубберы на расширенный диапазон сифонирования. настройка Contaminated установит вентиляцию на нормальное атмосферное давление, а скрубберы - на расширенный диапазон, всасывая все газы, которые не являются азотом или O2.
Трубы, вентиляция и другие объекты атмосферики могут быть размещены в стенах! Чаще всего проще сбрасывать газ в стены, чем пытаться сбросить его в космос. Даже если стена будет разрушена или удалена, газ не выльется.
4-ходовые коллекторы имеют тот же объем, что и две трубы, расположенные друг над другом, идущие с севера на юг и с востока на запад. Поэтому оптимальным вариантом использования теплообменных труб является применение целого набора 4-ходовых коллекторов.
Замораживатели и нагреватели можно поместить прямо на трубы, и они подключатся к ним! А знаете ли вы, что морозильники и обогреватели могут менять слой трубы с помощью применения мультитула на своей плате?
Из-за медлительности насосов их следует избегать, если только они не предназначены для конкретных целей. Объемные насосы отлично подходят для стабильной регулировки скорости и давления в системе труб, поскольку их предел составляет 9000 кПа. Насосы давления отлично подходят для регулирования давления и медленного движения газа, будьте изобретательны!
С помощью использования слоёв трубопроводов можно сделать многое, очень многое. Нет двух вариантов, вам придется экспериментировать!
Инструменты атмосферника
Основная страница: Atmospherics items
Rapid Pipe Dispenser
Это ваш Быстрый раздатчик труб. Таких, как он, много, но этот - ваш. Главный инструмент вашего ремесла, РПД - это то, что вы используете для создания новых атмосферных устройств. Используйте его для изменения планировки станции, для создания новых производственных соединений, для добавления скрубберов и вентиляции в различные части станции и многого, многого, многого другого. Используйте его и используйте хорошо. Имейте в виду, что при изменении выбора это устройство искрит, и искрит сильно. Искры могут вызвать пожар, если рядом находятся горючие газы.
Analyzer / BreathDeep Catridge
Если РПД - это ваш меч, то Анализатор ![]() - это ваш глаз. Используйте его для определения различных газов в различных трубопроводах (подробнее о трубопроводах позже), для анализа воздуха вокруг вас, для выявления проблем, вредных газов и других различных явлений, связанных с атмосферой.
Анализатор также обладает функцией барометрии, позволяя получать информацию о надвигающихся бурях при нажатии Alt-Click на планетарных средах.
- это ваш глаз. Используйте его для определения различных газов в различных трубопроводах (подробнее о трубопроводах позже), для анализа воздуха вокруг вас, для выявления проблем, вредных газов и других различных явлений, связанных с атмосферой.
Анализатор также обладает функцией барометрии, позволяя получать информацию о надвигающихся бурях при нажатии Alt-Click на планетарных средах.
ATMOS Resin
The Backpack Firefighter Tank![]() can switch modes to launch transparent ATMOS resin instead of extinguisher. This resin has the following effects:
can switch modes to launch transparent ATMOS resin instead of extinguisher. This resin has the following effects:
- Repairs hull breaches similarly to Metal Foam.
- Cleans the air from toxins.
- Normalises air temperature to room temperature (20°C or 293.15K).
- Seals open vents (as if they were welded shut).
- Removes slipperiness from floors (from water etc).
- The foam itself is not slippery.
To use the Backpack Firefighter Tank, equip it on your backpack slot and click the new hud icon to take out the nozzle![]() . You can then cycle modes between extinguisher, resin launcher and single tile resin launcher (foamer) by activating the nozzle in your hand. It spends water when used. Examine the nozzle to see water remaining. This anti-breach and firefighting tool can be ordered from cargo or found in atmospheric lockers.
. You can then cycle modes between extinguisher, resin launcher and single tile resin launcher (foamer) by activating the nozzle in your hand. It spends water when used. Examine the nozzle to see water remaining. This anti-breach and firefighting tool can be ordered from cargo or found in atmospheric lockers.
ATMOS Holofan
The holofan ![]() is a wonderful tool that can project up to 6 holographic barriers which block gas movement. You can use these holofans to isolate breaches, prevent a spill from getting worse, or even to do basic retooling of the atmospheric layout (such as using a holofan on a pressurized plasma pipe you are about to unwrench). Keep in mind however, that holofans don't block the superconduction (explained later) of hot gases and is less reliable in very high temperature environments, especially when fire is involved.
is a wonderful tool that can project up to 6 holographic barriers which block gas movement. You can use these holofans to isolate breaches, prevent a spill from getting worse, or even to do basic retooling of the atmospheric layout (such as using a holofan on a pressurized plasma pipe you are about to unwrench). Keep in mind however, that holofans don't block the superconduction (explained later) of hot gases and is less reliable in very high temperature environments, especially when fire is involved.
Thermal Imaging Goggles
A special mode can be found on your Tray scanner goggles found in your locker that will provide a HUD revealing the temperature of the surrounding turfs in a medium radius around you. The colors range from dark blue (freezing cold) to green (normal temp) to red (blazing hot). The goggles themselves can also be printed from the Engineering department's protolathe. The mode is useful for quickly identifying problem areas in a room, like where the source of a hull breach might be.
Atmospherics Layout
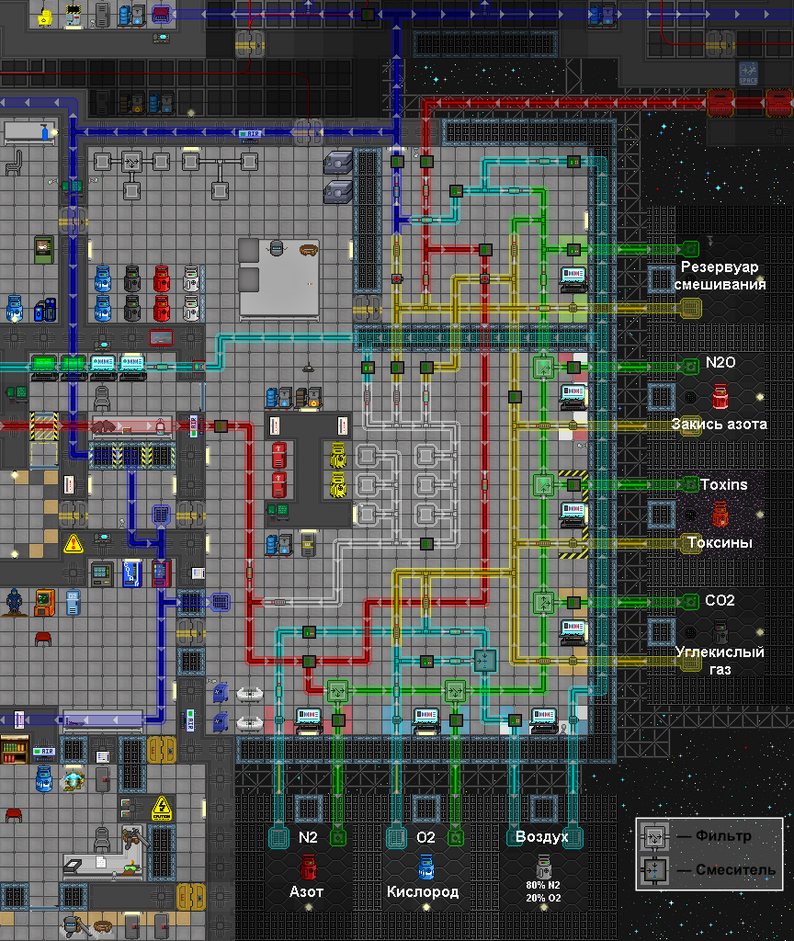
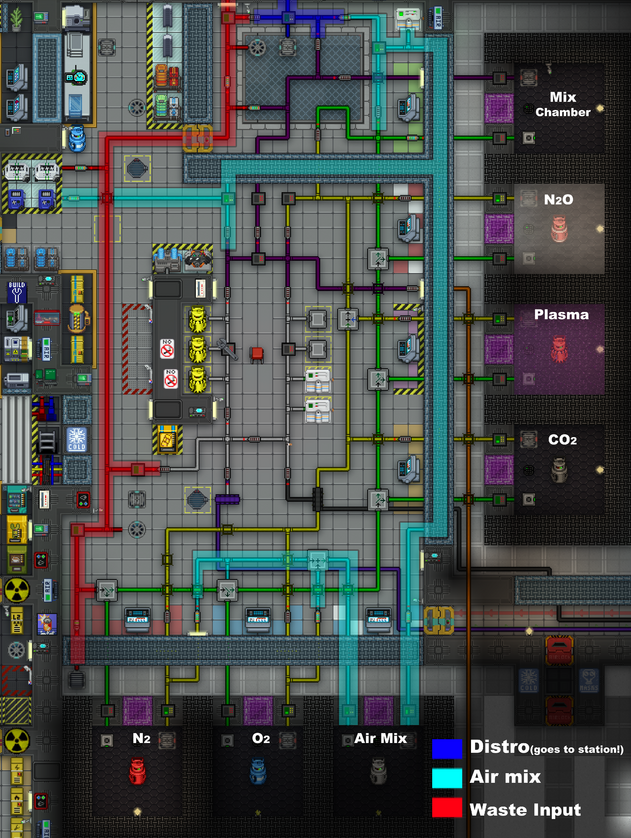
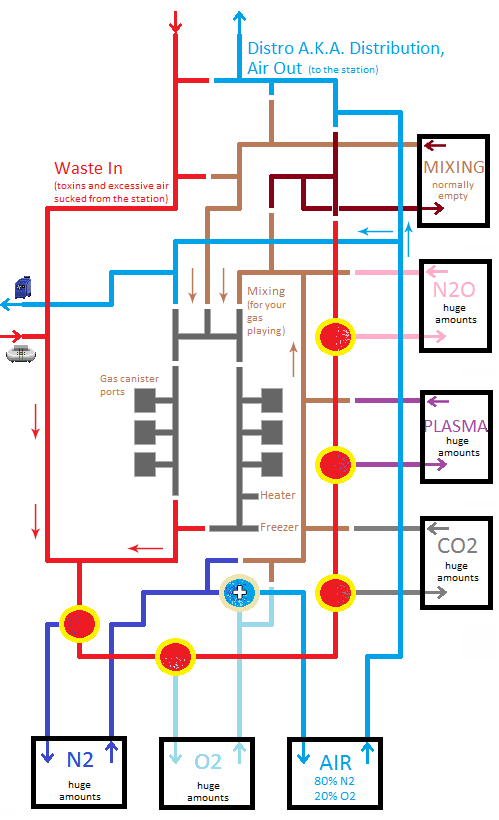
Here are two pictures of the atmospheric pipe system. Right one is a "simplified" version of the left picture. Yellow circles representing the filters which filter out a certain gas from the Waste In -gasmix. The light-yellow circle near the lower middle represents the mixer which mixes N2 and O2 into a breathable air mix.
Atmospherics is pretty simple, but the pipe layout makes it slightly confusing for the untrained eye. There are 4 major pipe "loops":
- The dark blue pipe loop is the distribution loop. It sends air to all the vents on the station for the crew to breathe.
- The cyan air mix pipe loop, which is specialized to mix and provide the air mix to the distribution loop, and is used to fill air pumps outside the front door of Atmospherics.
- The red/green pipe loop, which retrieves the gas in the station via the air scrubbers (red loop) and passes them through a set of filters (green loop).
- The yellow pipe loop, internal to Atmospherics, which is used for custom gas mixes that can be fed into the canister charging station in the middle of atmospherics, or fed into the mixing tank.
The tanks (the small rooms in space just outside of Atmos) of the station's atmospherics network, unlike in the rest of the station, are rooms filled with very high pressure of the appropriate gas. The output of these rooms are controlled by their respective Supply Control Computer, an on/off valve, and an output pump for each loop. Note that these rooms can be depleted, especially if someone makes a hole in a tank's external wall.
To understand how the breatheable air mix is mixed, try following these steps and looking at the map at the same time, it starts on the south end of Atmospherics, like so:
- The gasses are pumped through the cyan tubes from their respective tanks (N2, O2).
- They are mixed in the air tank (Air) to a 1/5 mix of O2 and N2.
- The breathable gas is then pumped through the cyan loop to the north of Atmospherics.
- And finally, it's pumped into the dark blue distro loop and out to the station for everyone to breathe.
Next let's make up an example situation to see how the waste system works in action:
- Scientist Bill messes up and fills the Toxins Lab with plasma but fortunately manages to evacuate the room safely.
- Being an otherwise ideal situation Atmos-wise, the Toxins Lab's air scrubbers have been set to filter out all hazardous gases (they're not set by default, this has to be done through the Air Alarm manually or by asking the AI to do it) and plasma starts to get sucked through the scrubber into the waste pipes.
- The plasma arrives to the Waste In -loop (the red pipe loop) at Atmos. It travels south through the pipes, its first stop being the N2 Filter.
- If there was any Nitrogen in the waste gas, it would get filtered out here, and the rest of the gas continues its journey through the waste loop, same thing happening at every filter.
- The plasma finally reaches the Plasma Filter.
- Here the plasma gets extracted from the waste gas and pushed into the big plasma tank-room outside the windows.
- The plasma stays in the room until someone decides to pump it out.
- Scientist Bill by now notices that the Toxins Lab has no plasma anymore and is able to safely continue their work. Yay!
Setting Up Atmospherics
It's about time we stop with the theory and throw it out the window and get down to business. The Rapid Pipe Dispenser (found in your locker) can dispense and secure infinite pipes, and your wrench can disconnect and connect pipes to each other. There is a very old stationary Pipe Dispenser that can be found in the room as well, but it's way faster to use the RPD.
Next up is a very simple step by step guide how to set up the Atmospherics pipe system to be (nearly) as efficient as possible. Despite popular belief by your neighbors the Station Engineers (and the rest of the unwashed masses in the station), Atmospherics NEEDS TO BE SET UP TO WORK WELL. It's similar to the Supermatter Engine in a way; you could just start the emitters and it might make some power, but doing that with no setup is terrible and probably prone to blowing up. While atmos' likely isn't going to blow up, without prior adjustments it's terribly slow and very easily clogged.
Note that this is only one style how to set up the pipes, there are many ways, and they all have their own pros and cons!
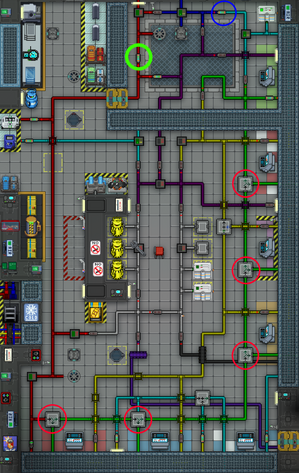
- For the love of Nanotrasen, at least do this:
- Select a Volume Pump in your RPD and replace the green circled normal pump with a volume pump (or a valve if you are using the waste loop as a large volume mix chamber), making the waste gas -system >100x more efficient. We want the waste gas sucked from the station into the waste system as soon as possible!
- Set all red circled filters ON and set them to maximum pressure (200 L/s) so waste gases will actually be moved, if they're not already maxed out.
- This is good as well:
- Go through the N2 and O2 (besides southern wall) and set their output to roughly 300 kPa. Maxing out the pumps to 4500 kPa drains all of atmos' gases way too quickly, there really isn't any reason to turn the pumps up to maximum unless you're flooding.
- Set the pumps next to the computers at 300 kPa also, so the gases being pushed out of the gas-room get moved fast too.
- Set the Air-computer's output to some amount over 300 kPa, the pumps automatically keep the gas throttled.
- Set the blue circled Air to Distribution pump to something around 800 kPa to fill up the air distribution loop. Don't max this one out, unless you want all your air to end up in the pipes (could be very annoying to filter out all of that gas if someone were to put dangerous gas in the pipes).
- If there's a thermomachine in the distribution room connected to the air pipe, it also can't hurt to heat it up a number of degrees, so the station gets warm air in the event of a breach.
Pros and cons of this whole setup:
- + Quick toxin filtering: In case of a toxin leak, waste gas will be sucked out quickly (if the area's air alarms are set to filter out all the toxins, that is, by default they are NOT filtering anything besides CO2).
- + Quick repressurization: In case of a breach, air will be poured out with a nice pace, helping you re-pressurize the room quicker after the breach is fixed. The refill setting on the air alarm will also actually work with the added pressure in the distro pipe.
- + Reduced pipe sabotaging: With this setup, it's harder for the grifflords to fuck up pipes in the maintenance tunnels. In a room with the default 101.3 kPa atmospheric pressure, pipes with more than 303.9 kPa pressure fling the unwrencher in a random direction.
- - Air Alarm sabotages: The station is more vulnerable for sabotage through air alarms. Someone can quite easily hack an air alarm somewhere and set the vents to push out air at maximum pressure, resulting in over-pressurization.
- - Space wind: In case of a breach, until the hole is fixed, you'll probably spend a small while fighting against the huge air current, a.k.a. "space wind", if you don't switch the vents off during the repair. This is mostly just annoying. to deal with this, find a pair of magboots.
- - Very slow pipe manipulating: If you suddenly have to modify any of the distribution pipes around the station, you need to lower the pressure to under 303.9 kPa if you don't want to be flung around like a leaf in the space wind, which can take a long time.
One extra thing to keep in mind is the fact that the thermomachines around the station dump their heat collected from cooling gasses directly into the waste loop. Common sources are the cryo tubes in Medical and the machines in the Ordnance Lab. Waste tends to collect only a small amount of CO2 (which is filtered back into waste) to act as a buffer to absorb said heat. With this low amount of gas, it absorbs the heat VERY poorly and suddenly the station's waste line is a couple thousand degrees. Factor in any future fires that might add hot gas to the waste line, and this means the super-hot waste gas coming into atmospherics for filtering are going to take forever to make it through the pumps and filters. Not good!
To fix this, you can add more CO2 to waste to act as a buffer for heat absorption, as well as setting up some sort of cooling for waste. This can be freezers or a heat exchanger array in space connected to the waste line. This is all entirely up to you how it gets cooled, but this is merely extra setup to ensure atmospherics runs well if you have the time to do it.
Done correctly, Atmosia should be pumping good air just faster than it's lost, and draining bad air away as fast as the traitors can set it on fire or alternatively draining good air away as fast as a malf' AI can siphon it. You can go kick back in the bar like a boss and wait for the inevitable minor station damage and cries of "Call the shuttle!" on the radio from folks who don't even know it isn't a big deal.
Your Very Own Customized Mix
To create a custom mix of gas, turn on the output of the supply control computers, open the manual valves, and turn the output of the pump to what you wish it to be. The gas will travel through the yellow pipes into the mixing chamber. The gas mix is pumped into the mixing chamber via a pump north of the yellow loop.
The mix obtained can then be pumped into the distribution and filtering loop or used to fill canisters. Remember to turn off the pump between the yellow and red pipe network or your custom mix will just go into the red waste loop.
Atmospherics and The Station
Over the course of the shift, various parts of the station might regrettably explode and vent out your precious, precious air. This is where you come in. Grab your nearest metal or Rapid Construction Device ![]() and rush off to seal the breach. Grab adequate pressure and temperature protection if you have not. If your distribution loop is ready, refilling should be absolutely easy. Rush to the air alarm in the corresponding area and fill the air by interfacing with the Air Alarms
and rush off to seal the breach. Grab adequate pressure and temperature protection if you have not. If your distribution loop is ready, refilling should be absolutely easy. Rush to the air alarm in the corresponding area and fill the air by interfacing with the Air Alarms ![]() . You might expedite the process by setting the operating mode to "Refill" or even to turn off external pressure checks by manually setting each vents under "Vent Controls" to Internal and 0 kPa. Alternatively, hauling some canisters of air
. You might expedite the process by setting the operating mode to "Refill" or even to turn off external pressure checks by manually setting each vents under "Vent Controls" to Internal and 0 kPa. Alternatively, hauling some canisters of air ![]() , a portable pump filled with air
, a portable pump filled with air ![]() , or even deploying a few Proto-Nitrate crystals
, or even deploying a few Proto-Nitrate crystals ![]() if you've made some can all help refill the air even faster.
if you've made some can all help refill the air even faster.
Over the course of the shift, the environment might become cold or hot too. Common sources of coldness include space and icemoon wind rushing in, check for opened airlocks! Common sources of heat are usually gas combustion ![]()
![]()
![]() and Pyroclastic Anomalies. To combat the temperature problems, there are many things that you could do:
and Pyroclastic Anomalies. To combat the temperature problems, there are many things that you could do:
- You could utilize Space Heaters
 , though their efficiency is questionable unless you upgrade their micro-lasers and capacitors to stretch out their battery life.
 - You could cycle the air
 ; be it from the "Cycle" Operating Mode or from manually Panic Siphoning and setting the air to Refill.
 - You could even build a thermomachine
 and haul a portable pump
  to a location and keep cycling the air locally. This will heat up or cool down the air very quickly.
 - Your trusty ATMOS Resin
 will also set air to 20 degrees Celsius and might be of great use here, but keep in mind that it seals scrubbers and vents off.
 - You also have the holofan
 to prevent the cold from spreading further.
 - If you've made them in the Crystallizer, Healium crystals Файл:Healium crystal.pngare quick and effective at correcting temperature issues. Just activate and throw 'em in!
You have great tools at your disposal, but also a great adversary to face. Good luck in your job as the Custodian of The Air!
Atmospherics 201: Gaseous Synthesis, Machinery, Further Theory, and Optimization
The Gases and Their Functions
Let's start with some theory about the gases. Below are the different gases that can be found in-game.
Quick note: The endothermic and exothermic descriptions in these gaseous reactions are measured with respect to enthalpy. Heat capacity can change, and this means that there might be cases where you have an exothermic reaction but the temperature is actually falling. Experiment!
Gaseous Export: Gas canisters can be exported through cargo in exchange for money. They are however, subject to elasticity and will give diminishing returns for each mole exported. Gases will roughly fall to half their credits per mole value at around the 2100 moles mark, quartering at 4201 moles, and becoming one tenth of their original base export price at 6978 moles. These diminishing returns are tracked individually per canister.
 O2
O2
Our first base gas is Oxygen. All humans, pets, and lizard-people need more than 16 kPa of oxygen in the air or internals to breathe. Any less and the creature starts to suffocate.
It is required to oxidize fires. The specifics of each fire reaction will be detailed down below.
Oxygen is an invisible gas. To detect it, use your PDA or a wall mounted Air Alarm. Oxygen canisters are marked in blue. Emergency Oxygen Tanks, filled with about 300 kPa, spawn in your emergency Internals Box. Larger Oxygen Tanks are in Emergency Lockers all across ship, which start with about 600 kPa.
Export price per mol: 0.2 credits
 N2
N2
Our second base gas is Nitrogen. Not particularly more heat absorbent than any other gas. However, it cannot burn at all, which may slow down fires simply by taking up space. It can reduce the heat penalty on the SM, which will keep temperatures down.
Export price per mol: 0.1 credits
 Air
Air
A 1:4 gasmix of O2 and N2 (20% O2, 80% N2). The station is filled with this.
Air in SS13 can be seen, strangely enough, as a 'watered down'-O2, with N2 being the water. Optimal atmospheric pressure for humans is 101.3 kPa. Due to the minimum of 16 kPa of O2, the pressure of 101.3 kPa cannot be changed too much without the situation becoming excessively lethal. Under 16 % oxygen? You start dying. Under 90 kPa due to fire from a while ago? You start dying. Be mindful of this.
 CO2
CO2
The third gas available for atmosians from the start of a shift: Carbon Dioxide. What the fuck is Carbon Dioxide!? It's an invisible, heavy gas. It chokes people effectively and quickly, and if you can be bothered to set the alarms up, will result in an invisible room that kills those in it. Takes some setup and can be very, very annoying. Causes people to gasp at low levels. It is also often used to beef up the power generation of the Supermatter Crystal.
Export price per mol: 0.2 credits
 Plasma
Our fourth and the most infamous of the base gases: Plasma, a.k.a. Toxins. Plasma is purple, toxic, and flammable. When ignited in an oxygenated room it will produce fires.
Plasmafires use oxygen and plasma to produce heat and waste gas. Energy released from plasmafires depends on the burn rate for plasma. The plasma burn rate itself depends on the composition of the air and the temperature of the burn. Optimal composition for maximum burn rate is 10x more O2 than Plasma, with the air temperature exceeding the upper limit of 1643.15 Kelvins. Oxygen is burned at 0.4x the rate of plasma at temperatures above the upper limit. More oxygen (up to 1.4x the plasma burn rate) will be consumed for lower air temperatures.
The aforementioned waste gas of plasmafires are either solely tritium on oxygenated plasmafires (more detail on the tritium section below) or water vapor and CO2 on a 3 CO2 : 1 H2O ratio on non-oxygenated plasmafires.
Export price per mol: 1.5 credits
 N2O
N2O
The final base gas available in the atmos' tanks: Nitrous Oxide, a.k.a. Sleeping Agent. A white-flecked gas.
Makes you laugh at low doses and at higher ones puts you to sleep. If using this as a sleep gas mix do not forget to mix in at least 16 kPa of O2, or you will suffocate someone. This decomposes into Nitrogen and Oxygen at temperatures at or over 1400K, creating Nitrogen equal to the amount of N2O used, and half that amount in Oxygen.
This gas can additionally be synthesized. This requires 20 moles of Nitrogen, 10 moles of Oxygen, and 5 mol of BZ to be present, at temperatures between 200K and 250K. For every mol of nitrogen consumed, 0.5 mol of oxygen is consumed. BZ is not consumed whatsoever, and only serves as a catalyst. The reaction is mildly exothermic. You should be wary of this reaction if your intention is not to create N2O, as this reaction consumes Nitrogen and Oxygen extremely quickly.
Export price per mol: 1.5 credits
 Tritium
Radioactive, flammable gas that is used in plenty of chemical reactions. Created by heating loadsa O2 with Plasma. Emits radiation when combusted in the air, as well as pipes and canisters. Might not want to put this into any engine unless you plan to set it on fire.
Tritium is created in fires that are super saturated, i.e. fires where there are 96 more units of oxygen than plasma. One popular ratio used by many Atmosians is 97 O2 : 3 Plasma, this won't hit the super saturation threshold from the get-go, but given time the oxygen input will overflow the oxygen burn rate, resulting in a net positive oxygen gain in the chamber and eventually hitting the threshold. This oxygen accumulation continues over time, and therefore it is a good idea to lower the oxygen ratio in the burn mix over time. It is recommended to bump up the plasma ratio to 50% after ignition, as that will allow more plasma to get put in and burned, while maintaining composition.
Important to remember is that tritium will likely be very hot when exiting the chamber, opening possibilities of cracked canisters and eventually toasted incinerators. Prepare accordingly! It is also worthy to note that tritium when allowed to react with oxygen will burn up into water vapor. Due to the chamber having a lot of oxygen, it is often a good idea to add a second scrubber to prevent too much tritium from being lost. Keep this in mind when attempting to get sizable amounts of it.
Tritium can burn very quickly when exposed to lots of oxygen, and can release enough energy to melt the hull in a short amount of time.
Export price per mol: 2.5 credits
 Water Vapor
Pure H2O. Keep away from the Clown - this slips people and even freezes tiles when released at low temperatures.
The Janitor starts with a tank in their closet; created as a waste product on tritium fires and unsaturated plasma fires. It should be noted that this gas will disappear through a process called steam condensation. If a tile with water vapor on it is below 303.15K it will make tiles slippery, consuming some of the water vapor. If the tile is below 200K it will instead freeze the tile, which is also slippery. Note that this happens esentially instantly and consumes all of the available water vapor. Be careful if you need to cool it.
Export price per mol: 0.5 credits
 H2
H2
Hydrogen is a flammable gas which when ignited burns similarly to tritium. It is also an integral part of fusion reactions. Hydrogen is made by electrolizing Water Vapor with an electrolyzer machine.
Hydrogen is solidified in the Crystallizer with BZ as catalyst at high heat and pressure (around or above 10,000K) to produce metal hydrogen ![]() , which can be used to make Elder Atmosian armor, a fireaxe
, which can be used to make Elder Atmosian armor, a fireaxe ![]() , and golems.
, and golems.
Export price per mol: 1 credits
 BZ
BZ
BZ gas is a potent hallucinogenic that also puts slimes into stasis and degenerates changeling chemicals. When the partial pressure is over 10, those breathing it will have a 33% chance per tick to get 3 brain damage, up to a maximum of 150. BZ sees frequent use as an ingredient/catalyst in many gas reactions.
BZ is formed in an exothermic reaction when at least ten moles of each N2O and Plasma are combined at low pressures. The optimal pressure for this is 0.1 atmosphere, or about 10 kPa. Efficiency might be higher if you get it even lower somehow, though. Plasma is consumed at 2x the rate of N2O.
If mixed in a tank with oxygen, it can be used for internals, to encourage spiritual development. Breathing it also produces BZ Metabolites.
Export price per mol: 1.5 credits
 Pluoxium
A non-reactive Oxygen substitute that delivers eight times as much O2 to the bloodstream, with as little 3 kPa minimum pressure required for internals!
Pluoxium may be created by exposing O2, CO2 and Tritium together in an exothermic reaction between 50 K and 273 K. This reaction creates a minimal amount of H2 (1% of Pluoxium created) as a byproduct. The consumption ratio for this reaction is 100 O2 : 50 CO2 : 1 Tritium. Furthermore, Pluoxium is also created by the Supermatter, when Oxygen and CO2 are present. Oxygen is created by the Supermatter itself when it's running, with the quantity of this production based on various other factors. Adding some CO2 to the Supermatter can be an easy way to produce Pluoxium!
Export price per mol: 2.5 credits
 Miasma
Miasma (bad air) is created from bloomed Corpse Flowers. Miasma smells bad and can cause diseases to spontaneously appear. The higher concentration of miasma in the air, the higher level symptoms can appear. Sterilized into oxygen in a slightly exothermic reaction at 170 degrees Celcius. Presence of water vapor in quantities higher than 0.1 moles prevents this from happening. This reaction has the lowest priority out of all reaction in the game. It is otherwise absolutely inert in terms of atmos reactions.
Export price per mol: 1 credits
 Nitrium
Nitrium (a combination of the old gasses Nitryl and Stimulum) is a gaseous stimulant that when inhaled can enhance speed and endurance. At low concentrations Nitrium will increase your top running speed while healthy and unimpaired. At slightly higher concentrations breathing Nitrium will form Nitrosyl plasmide in the bloodstream, providing immunity to sleeps. This is in addition to the speed boost. Damage slowdown from stamina damage (stun batons!) will still slow you even with the stun immunity. At high concentrations breathing it will damage a person's lungs.
Nitrium is made by combining a minimum of 20 moles Tritium, 10 moles Nitrogen and 5 moles BZ in a (slightly) endothermic reaction above 1500K. The consumption ratio for the reaction is 20 N2 : 20 Trit : 1 BZ. Higher heat improves the rate of reaction. Also formed in high quantities by fusion.
Nitrium decomposes exothermically when in contact with Oxygen under 343.15 K, splitting into a 1:1 mix of Nitrogen and Hydrogen. Meaning you will have to experiment to find a way to breathe Nitrium and not suffocate while doing so if you wish for ultimate power.
Breathing Nitrium in high concentrations will quickly cause lung failure, make sure that Nitrium makes up a minority of your tank.
Export price per mol: 6 credits
 Freon
Freon
On temperature lower than 0°C (273.15 K) Freon will create an endothermic reaction with O2, meaning it will absorb heat from the atmosphere, down to a minimum close to 50K. Adding Proto-Nitrate will catalyse the reaction so that it may begin at temperatures up to 310 kelvin, which is above room temperature. This reaction produces CO2 and if the temperature is between 120-160K the reaction has a small chance to also produce solid sheets of hot ice ![]() . Breathing Freon causes burn damage and slows down.
. Breathing Freon causes burn damage and slows down.
Freon is made by combining a minimum of 0.6 mol of Plasma, 0.3 mol of CO2 and 0.1 BZ, with reaction speed depending on temperature, as depicted in the graph below. The reaction is endothermic. The consumption ratio for the reaction is 6 Plasma : 3 CO2 : 1 BZ, forming 10 moles of Freon. Unless you're able to push the reaction into high temperatures, it is best to try and maintain a temperature of 800K. The energy consumed by the reaction also scales up as temperature increases, so it may be harder to maintain a high temperature than one might expect.
Export price per mol: 5 credits
 Hot Ice
Hot ice is a solid byproduct of the cooled Freon+O2 reaction at 120-160K. Can be sold to cargo at a high price. It holds a great amount of power inside. Can be ground to produce 25 units of Hot Ice Slush.
If hit with a welder or burned the hot ice will melt, releasing the power stored inside. This releases large amounts of hot plasma into the air. (Moles of plasma released = 150 x number of sheets) and (Heat released = 20 x number of sheets + 300K).
 Hyper-Noblium
Extremely inert, Hyper-Noblium stops other gases from reacting. (Specifically, it stops reactions when >5 moles and temp > 20 K)
Can be created when Nitrogen is combined with Tritium at extremely low temperatures (below 15 K). Reaction produces significant energy (exothermic) and BZ works to reduce the energy released, expect to have your temperature spike if you don't use BZ, the energy released is potent enough to be used for explosives! 10 mol of Nitrogen is used per mol of Hyper-noblium synthesised, and you also need at least this much to have the reaction occur. 5 mol of Tritium is the minimum required to have the reaction occur, and is the amount used when no BZ is present. However, the amount of Tritium used scales with the ratio of Tritium to BZ, all the way down to 0.005 mol used in a ratio of 1:1000 Tritium:BZ. In short: keep your BZ high and your Tritium low if you want to make a lot of this stuff!
Export price per mol: 2.5 credits
 Proto-Nitrate
Proto-Nitrate is a highly reactive gas, but non-toxic when breathed. It is created in an exothermic reaction when Pluoxium is exposed to H2 at temperatures between 5000-10000 K. Hydrogen is consumed at around 10x the rate of Pluoxium.
- When between temperatures of 260-280k, Proto-nitrate reacts with BZ to produce radiation, Nitrogen, Helium, and Plasma, as well as causing localized hallucinations, releasing radiation, including extremely high energy nuclear particles in an exothermic reaction.
- When between temperatures of 150-340k, Proto-nitrate reacts with tritium to produce H2 and radiation in an exothermic reaction.
- Proto-Nitrate reacts with at least 150 moles of H2 to create more Proto-Nitrate in an endothermic reaction.
Export price per mol: 2.5 credits
 Halon
Halon
Halon acts as a fire suppressant by removing oxygen in the air (while producing Pluoxium) in an endothermic reaction if the air temperature is above 70 C or 343.15 K. This will additionally release atmos resin. The oxygen suppression rate is 20 O2 : 1 Halon. Additionally, when it is inhaled it will cause a heavy slowdown even stronger than Freon while also making you heat proof, even being on fire won't damage you! It is created in a slightly exothermic reaction when electrolyzing BZ, releasing 2 moles of Halon and 0.2 moles of O2 per mole of BZ electrolyzed.
Export price per mol: 4 credits
 Healium
Healium (not to be confused with actual Helium) is a red gas which acts as a stronger sleeping agent than N2O, while healing burns, bruises, suffocation and toxin damage.
It is created by exposing Freon to BZ in an exothermic reaction at temperatures between 25-300 Kelvin (keep it chill). Freon is consumed at around 11x the rate of BZ; a little bit of BZ will very quickly transform all of your Freon into Healium if you're not careful.
Export price per mol: 5.5 credits
 Zauker
Zauker is an incredibly deadly gas if inhaled. It is made by mixing Hyper-Noblium and Nitrium in an endothermic reaction at temperatures between 50000-75000 K. Nitrium is consumed at around 50x the rate of Hyper-Noblium. It is worthy to note that Hyper-Noblium stops reactions when it is present in quantities above 5 moles, prepare accordingly!
Zauker also decomposes exothermically into a 30/70 O2/N2 mix when exposed to Nitrogen.
Export price per mol: 7 credits
 Helium
Helium is an invisible, inert gas. It has minor use within the Crystallizer to make a Crystal Cell, but otherwise is functionally useless. Sell it to cargo!
Helium is produced as a common byproduct of fusion in the Hyper-torus Fusion Reactor, or from a Proto-Nitrate/BZ reaction.
Export price per mol: 3.5 credits
 Anti-Noblium
Anti-Noblium is a rare gas used in high level Crystallizer recipes and as high tier fuel for the Hyper-torus Fusion Reactor. Outside of those uses, it doesn't do all that much. It does look pretty when in the air though!
Anti-Noblium can be made within the Hyper-torus Fusion Reactor when using Hyper-Noblium as the primary fuel with either Hydrogen or Tritium as the secondary fuel. It can also be created with #Hyper-Noblium in turfs with an active electrolyzer at under 150 kelvin, with a rate of 0.5 moles of Anti-Noblium per 1 mole of Hyper-Noblium.
Export price per mol: 10 credits
Physical Characteristics of Gases
TL;DR Gas flows from high pressure areas, to low pressure areas. Gas uses up more room when hot, less room when cold.
Ideal gas law: PV = nRT
Where R (ideal, or universal, gas constant) = 8.31, the following are linked by this equation.
Pressure (P): Measured in kPa, kiloPascals, Pressure is lethal above 750 kPa's. A pressure in a room above 1000 kPa's necessitates internals to breathe properly.
Volume (V): Another unseen variable, Volume is how much the area/canister/tank or piped tank has space inside it. This helps dictate how much gas it can hold. Volume is essentially the 'mole divider' when converting between a canister/air pump to your tank; having a higher volume essentially makes the tank that much more efficient, proportionally, so an Extended Emergency Oxygen Tank has twice the contained air per kPa in comparison to a regular Emergency Oxygen Tank.
Moles (n): Moles are the amount of particles of a gas in the air. It is moles that cause odd effects with a certain chemical. As it dumps so many moles to a tile, to keep the pressure acceptable, the moles have to be very, very cold, causing the infectious effect. Moles can be calculated by a form of the ideal gas law. n=(P*V)/(R*T)
Temperature (T): Measures in K, Kelvin, Temperature above 360 K and below 260 K causes burn damage to humans. Canisters rupture when the air surrounding them is over 1550 K.
Heat Capacity: A gasmix has heat capacity, and it is calculated by taking into account the quantity of all of the gases in the air and their specific heat. Heat capacity defines how much energy it takes to raise the temperature of a gas. The normal air mix (%30 O2, %70 N2) has a specific heat capacity of about 20 which doesn't impede heat transfer very much. Fires spreads quicker in gases with low heat capacity, and slower in gases with high heat capacity.
| Gas | Specific heat capacity (molar) |
|---|---|
| O2 | 20 |
| N2 | 20 |
| CO2 | 30 |
| N2O | 40 |
| Plasma | 200 |
| Tritium | 10 |
| Water Vapor | 40 |
| Hydrogen | 15 |
| BZ | 20 |
| Pluoxium | 80 |
| Miasma | 20 |
| Nitrium | 10 |
| Freon | 600 |
| Hypernoblium | 2000 |
| Proto-Nitrate | 30 |
| Halon | 175 |
| Healium | 10 |
| Zauker | 350 |
| Helium | 15 |
| Antinoblium | 1 |
Fire: An effect caused by the ignition of plasma, tritium, and hydrogen in an oxygenated room. It causes massive burn damage, and raises the temperature of the room.
In short, the colder the gas and the higher the container volume, the more moles you can fit inside. This is why hot gases clog the red waste pipes - they expand, allowing fewer moles to be transported.
Breathability
Do note that breathing is based on pressure and not moles! Moles breathed has no bearing on suffocation, only on gas consumption.
Humans need 16 kPa of O2 to survive. When not breathing through internals this 16 kPa is supplied by the environment, with a normal 21-79 mix of 101 kPa O2-N2 supplying 21 kPa of Oxygen to the lungs.
For internals this means that you are going to need a minimum of 16 kPa release pressure on the tank (adjusted by clicking the tank while in hand). Unpure mixes will require a higher release pressure to be breathable!
Consumption
The consumption rate for gas is dictated by the moles breathed in, all oxygen intake will be consumed and turned into carbon dioxide. Lungs are considered to be 2 Litres. Mole consumption works as follows:
- For most scenarios this is equal to 2/2500th of the environment gas.
- For internals this is further modified by the release pressure of the tank, with the breathed gas targeted to reach whatever release pressure set when inside the lungs. You can calculate this by using n = Release Pressure * 2 Litres / (8.31 * Temperature). A higher temperature will mean less gas will be breathed in per tick. This does not mean a longer internal! since the ratio of gas breathed in to the total gas in tank is still the same.
Temperature
Creatures start taking damage when the air breathed in is colder than 260 Kelvins or hotter than 360 Kelvins! This is separate from the cold or hot damage taken because a mob is too cold or hot though. There are damage increases in temperatures colder than 200 and 120 Kelvins or temperatures hotter than 400 and 1000 Kelvins. This damage is further multiplied for species such as lizards who take 3/2 times as much cold damage but 2/3rd as much hot damage.
Notes on optimization
- Pluoxium is considered to be 8 times as potent as Oxygen for breathing I.E. each kPa of pluoxium counts as 8 kPa. It's possible to run a pluoxium tank with release pressure as low as 2 kPa for a longer lasting internal.
- If external efficiency is important, it's possible for a hotter internal mixture to be made to conserve the amount of moles while still supplying an equal amount of partial pressure to the lungs.
Thermomachines
Combined entity of freezer and heaters, thermomachines allow you to influence the temperatures of gases connected to it. Thermomachines heat or cool the gas in their port to the target temperature.
A thermomachine "combines" the gas mixture actually present inside it with a gas mixture of a set temperature (depending on the user input) and heat capacity (depending on the quality of matter bins present).
Fusion
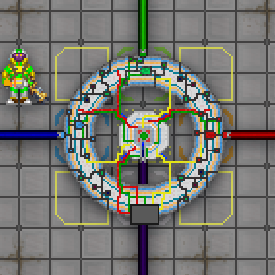
So you want to operate a fusion reactor? Well, it's about as dangerous as it sounds. On /tg/station, fusion has been redesigned several times and is currently on version 7: "Hypertorus Fusion Reactor (HFR)"-edition.
In version 7 of fusion, you must build a machine called Hypertorus Fusion Reactor.
The HFR is a 3x3 multi machine that needs the proper setup to be built. In most maps you'll find a proper space with outlines on the floor to designate where to put each piece.
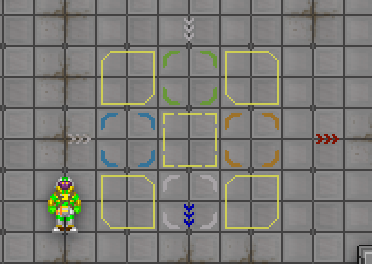
Click expand to see the how to build the HFR.
First thing first, you need to build the core of the machine. This piece has ONE port that is used for cooling the internal fusion mix, you can rotate the machine simply by using a screwdriver and a wrench (similar to how you rotate a freezer/heater)
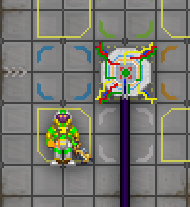
after the core is done, build the 4 corner pieces in the corners of the grid and the 4 ports for fuel, moderator gases, waste and interface.
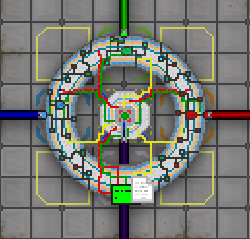
The result should be something that looks like this:
finalize it by hitting the interface with a multitool
A little piece of paper will show up, it contains tips on how to operate the machine that you won't find here, so read it carefully!
Now that you know how to build it, let's see what all those buttons do by starting from opening the interface.
Click expand to see how to operate the HFR Interface.
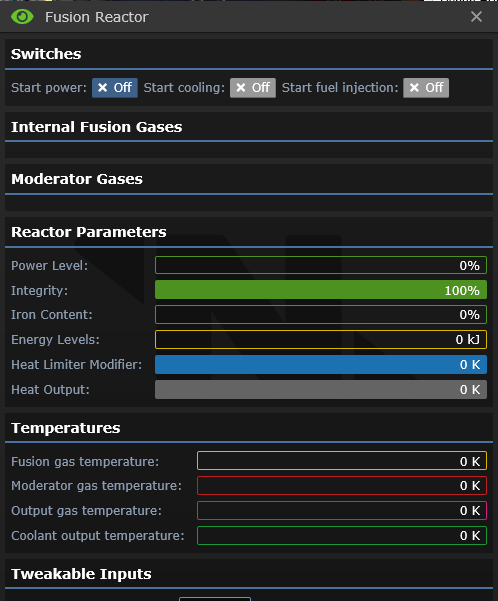
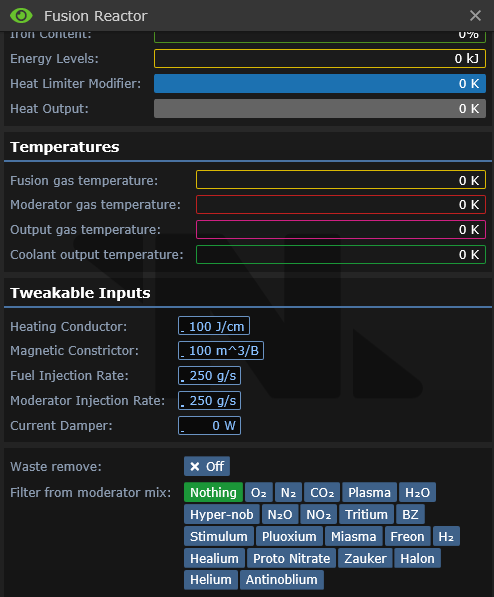
The interface it’s quite big and it has an overwhelming amount of informations but we’ll go through them one by one (you can also scroll to access all infos)
Those are the main controls, they control how the machine will behave
-Start Power starts the machine main loop and allow power drain and activates the other controls
-Start cooling starts the machine cooling loop, the one connected to the core
-Start fuel injection starts the fuel injection in the machine which will start the main fusion loop and thus starting the reaction itself
This will contain the gas mixture of the fusion gases and the moderator gases
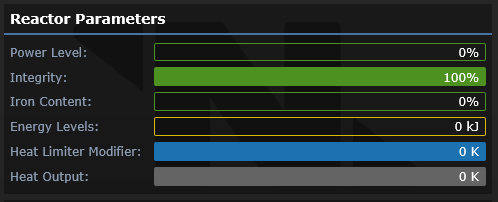
Those are the main parameters of the fusion reactor
-Power level goes from 0 to 600, from it depends the amount of power consumption (from 50 KW at PW 0 to 350 KW (it will be higher in the future)), the volume of the noise the machine makes, the damage the machine will take, the ability to turn off the machine safely (at high power level you can’t), fuel consumption, various other gas reaction/interactions.
-Integrity indicates the integrity of the magnetic containment field inside the machine, if it reaches 0 the machine will explode, is controlled by how many moles of gas are inside the fusion gasmix and their temperature and by other factors.
-Iron content is the amount of iron being produced inside the reactor, at high amounts will actively lower the integrity by damaging the fields, can be lowered by lowering the fusion temperature.
-Energy levels depends on the amount of moles inside, the kind of gas inside and the moderators too will have different impact.
-Heat limiter modifier will change depending on the power level, will limit the amount of heat the fusion can increase/decrease each tick (hotter gases are easier to heat up/cool down)
-Heat output is the main parameter affecting the temperature of the fusion reaction, is limited by the Heat limiter modifier and is affected by many other factors.
Those will show the gases temperature in real time
The flow of heat is Fusion > Moderator > coolant
(output gas will have either moderator or fusion temperature depending on the source)
If you don’t add a moderator the heat will go directly from the fusion to the coolant, but is much more inefficient.
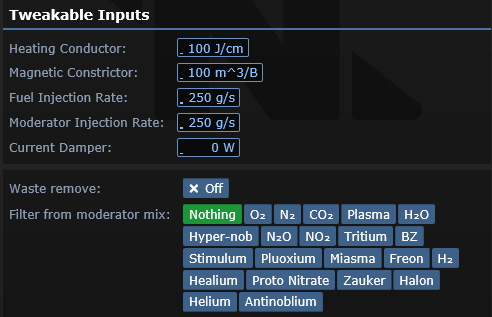
Those are inputs that the user can change
-Heating Conductor will change the Heat limiter modifier, higher numbers mean higher heat transfer. The Heat limiter modifier will affect the Heat Output by increasing/decreasing the maximum range possible; keep it at 100 for normal operations.
-Magnetic Constrictor will actively change the volume inside the fusion reactor, this affects instability and power output. Increasing the number will increase the volume available to the fusion gases, allows higher instability fluctuations and increases the influence of every gas inside the machine (positive and negative influences). Keep at 100 for normal operations.
-Fuel and moderator injection rate will change how much gas will enter the machine this affect consumption, and other gas related interactions
-Current Damper, life saver, will actively increase the instability of the fusion reaction making the reaction endothermic, that can set the heat output to negative cooling down the fusion mix, useful in meltdown situations. Counteracted by iron content.
-Waste remove will start to output helium/antinoblium at a fixed rate from the fusion mix and the gas you set to filter from the moderator mix allowing the user to filter out specific gases from the moderators
And now let's learn what each gases will do inside the machine
Click expand to see the HFR gas interaction section.
First thing to learn is the fuel: only a mixture of Tritium and Hydrogen will enter the fuel input port, no other gases will go inside (at least for now)
The moderator gases are special gases that have a double function, first they allow proper cooling for the core, second, they have interactions with the functioning of the fusion reaction itself, those interactions are:
-for the fusion gasmix:
--Hydrogen = increase the energy of the system and increase the heat modifier
--Tritium = increase the energy of the system and increase the power modifier
--Helium = decrease the energy of the system, increase the heat modifier and increase the radiation modifier
-for the moderator gasmix:
--Nitrogen = increase the energy of the system, decrease the heat modifier and decrease the radiation modifier
--CO2 = increase the energy of the system and increase the power modifier
--N2O = increase the energy of the system and decrease the heat modifier
--Zauker = increase the energy of the system and increase the power modifier
--Antinoblium = vastly increase the energy of the system and vastly increase the radiation modifier
--Hypernoblium = vastly decrease the energy of the system
--H2O = decrease the energy of the system
--NO2 = decrease the energy of the system and increase the power of the system
--Healium = decrease the energy of the system
--Freon = decrease the energy of the system, decrease the power modifier, decrease the heat modifier and decrease the radiation modifier
--Oxygen = decrease the power modifier
--Plasma = increase the power modifier, increase the heat modifier and increase the radiation modifier
Now you know how to build and operate the HFR - Hypertorus fusion reactor! Many other informations and tips are provided in game in the proper pamphlet after activating the machine, enjoy!
Crystallizer
The Crystallizer is a machine that allows gases to be solidified and made into various materials.
The working principle and gaseous requirements behind the crystallizer is rather simple and explained in the machine itself. You select a recipe, pump gases in using the input (green) port, meet the temperature requirements, and wait for the material to finish crafting. The red port is used for heat control, as it will conduct with the internal mix and influence the temperature. You have a 10% wiggle room for the temperature requirements, but straying too far from the optimal temperature will influence the final quality of the item produced. Quality affects the amount of gas consumed for each product produced, with higher qualities consuming less gas. The optimal temperature for any given recipe is the median between the lower and upper temperature bound. Stay as close as you can to the median value, and you'll be able to save up to 85% of the required gas if you manage to make the highest quality!
It currently supports the production of:
| Item | Properties |
|---|---|
| Metallic Hydrogen | A crafting material used for golems, axes, or the Elder Atmosian armor set. |
| Hyper-Noblium Crystal | A two use potion that can be used to pressure-proof two clothing items, turning them an icy blue color. |
| Healium Crystal | A grenade that can fix a large are of air to more reasonable temperatures. Good for firefighting and freezing temperatures. |
| Proto-Nitrate Crystal | A grenade that can refill a room with nitrogen and oxygen with a 8:3 split respectively. |
| Nitrous Oxide Crystal | A grenade that will release Nitrous Oxide (Laughing Gas). |
| Hot Ice | A material normally prodouced by freon combustion, also craftable with the Crystallizer.
When weldered or burnt, it rapidly releases a very hot and dense cloud of plasma gas. |
| Ammonia Crystal | A material with not much use except for exporting. Makes 2 every time it's completed. |
| Supermatter Shard | A smaller version of the extremely dangerous Supermatter Crystal used for power generation. |
| Diamond | A sheet of diamond. Many crafting and manufacturing applications. Used thorough the station. |
| Plasma Sheet | A sheet of plasma. Many crafting, manufacturing, and biological applications. Used thorough the station. |
| Crystal Cell | A non rechargeable cell with a huge power capacity. Rated at 50 MJ. |
| Zaukerite | A material without much use except for bragging rights. Makes 2 every time it's completed. |
| Drone Fuel Pellets | Three separate recipes that create Fuel cells used for drone explorations in Cargo.
Comes in three qualities denoting the difficulty of gases used. |
| Crystal Foam Grenade | A grenade that functions exactly like the standard Smart Metal Foam grenades that can be found roundstart.
Extremely simple to make compared to most other recipes. |
| Nitrium Crystal | A grenade that on detonation releases a chemical smoke cloud containing chemical Nitrium and Nitrosyl Plasmide. |
Bluespace Gas Vendor
This is the hub for gas purchase done by the crew. You only need to pipe your gas in and it will distribute it across vendors available station-wide. You can also set a price per mole for the gases. The gas will be at 20 degrees Celsius and is capped at 1013 kPa when purchased by the crew, do keep this in mind. You can also refill the individual vendors with metal for it to make more tanks.
After the Work is Done
This is a section dedicated to various tips and tricks, trivia, and things that you could do in your spare time:
- First and by far most important: make sure pipes don't get broken and if they do, fix them.
- Go around swiping your ID on Air Alarms, setting the operating mode to contaminated, and then re-swiping to lock it. You can ask the AI to do this as well, and probably should.
- Fill all the air pumps with air using a volume pump, these work until 9000 kPa compared to the pressure pump's 4500.
- Go to the red lockers, get a hard hat, gas mask and everything else that might be of use. Remember that you need both a fire suit and a hard hat to be resistant to weak fires. One will be useless without the other.
- Go grab the Fire Axe from the wall mount and hide it somewhere so the chucklefucks won't get it and go killing. DON'T take it with you and go walking through the hallways trying to look like a badass, you'll be the prime target of any antagonist/griffon who needs an efficient weapon.
- Least importantly, maintain the disposals system. You can generate pipes, but it needs welding and is generally a pain in the ass. You can also make fun slides, though.
- Using H/E pipes in space you can cool things down to a very low temperature very quickly. By making a cross with two off them you can have two on
- Gas pumps are for precise pressure control, volumetric pumps are for really fast pumping, and passive gates are for having 'one way' manual valves.
- Extremely high-temperature gases (like those from a panic siphoned fire) can really clog the waste loop. Could you do something to correct that?
- No one uses the ports outside of the 'refilling' station, but that doesn't mean that functionality can't be added onto them!
- The wall section that looks like the letter 'I' can be dismantled if you need more working space for pipes.
- Don't count out the grated window areas, they can be a great (har har) way to utilize the vacuum of space without an EVA suit.
- Speaking of EVA suits, your engineering buddies can potentially help you with anything you might want to do in space, be it adding or modifying pipes. Watch the hilarity as that incompetent engineer fumbles when setting up a heat exchanger pipe loop!
- The mining station doesn't have air recycling. Very long rounds might make this a problem for any miners working there.
- Any gas at pressure over 1000 kPa will cause you to start suffocating as in a vacuum. You can just use internals, though.
- N2O is invisible at low pressures. If you start giggling, put on your internals to avoid passing out.
- Any gas can displace O2, and less than 16 (also useful for optimizing internals) kPa of oxygen starts the Oxyloss. CO2 can be removed with the scrubbers, but to get rid of N2 simply apply some way of removing gas from the air and adding O2. My personal favorite is 2 air pumps, 3 connectors and an Air Filter and a canister: 1 pump draws in, goes through the connection and filters N2 into the canister, and the rest to the other pump, which expels it. Can also be used for N2O which is only sluggishly scrubbed otherwise.
- Pressures above 750 kPa do 10 DPS + 5 DPS for every extra 375 kPa above that mark, rounded off. Space suits completely block it all, but there is no other defense.
Atmospherics 301: Pipeline and Pipenet Theory; LINDA: Active Turfs & Excited Groups; Superconduction
LINDA? What is LINDA? LINDA is our atmospherics system. There are various theories on the origin of this name, but that is not why we are here. We are here to understand how gas dissipate, how pipelines and eventually pipenets are formed, and the more technical parts of atmospherics.
For a technical breakdown of our atmospherics subsystem and how everything works, refer to https://github.com/tgstation/tgstation/blob/master/code/modules/atmospherics/Atmospherics.md
Pipeline and Pipenet Theory
If there is one part of Atmospherics 301 that you should read, this is it.
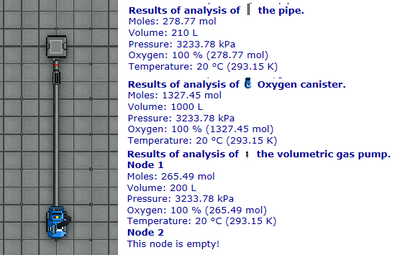
Our pipes don't simulate flow. Every interlinked pipe is combined into a single pipeline, and every pipeline member is subject to gas sharing. This gas sharing is instantaneous. Let's take the picture on the picture to our right as an example. The gas from the canister will immediately appear on the first node of the volume pump because both of them are connected through the same pipeline, even if the pipes are ten, twenty, or a hundred times longer. As long as two things are part of the same line they will equalize instantly.
The amount that each part of the pipeline gets in the aforementioned gas sharing process is determined by their volume. The first node of the gas pump will get 200/(210+1000+200) of the gas present in the pipeline, the pipes themselves will get 210/(210+1000+200), and the canister will get 1000/(210+1000+200). Most atmospheric devices perform actions only on the gas directly present in their nodes. The pump will only be able to pump this 200/(210+1000+200) portion of the gas allotted to it to the second node. The pipeline will then redo the gas sharing, just with less gas in it (because a part of it has been pumped away), and the process can repeat again.
This means that for bigger and bigger pipelines, each machinery will have a smaller and smaller share of the total volume and will be able to perform work on less and less gas. This is why taking gas out of the huge distribution loop is tedious and long, this is why some supermatter setups will lack moles directly inside the chamber if you expand the cooling space loop too much, this is why thermomachines are less reliable on very huge pipe networks.
LINDA: Active Turfs and Excited Groups
Our atmospherics system: LINDA, work based of concepts of active turfs and excited groups. A turf (tile) will become active when any gas changes happen, be it a plasma canister being opened, a breach occurring, or as simple as scrubber taking CO2 out. A turf will also become activated if a wall is deconstructed, necessitating it to be filled. These active turfs will combine into an excited group and equalize every several iterations of the subsystem ticking. This is LINDA in its simplest, most abridged form.
Superconduction
On high temperatures, superconduction occurs. Superconduction transfers heat between gases in the air and the objects in the world, most notably floors, windows and walls. If these objects are too hot, they will break or melt.
Another very visible effect of superconduction is on super-hot turf-based fires (incinerator springs to mind). Reinforced floors have the temperature of 20 degrees Celsius and a very high heat capacity. This means that these reinforced floors will almost always never move their temperature and stay at 20 degrees. Very hot gas mixtures on top of reinforced floors will constantly try to share heat with the floor and lose energy. In other words, reinforced floors constantly cool your fires down. This makes reaching very high temperatures on turfs very difficult.
It is possible to try and circumvent this phenomenon by burning things inside a canister or pipes.
 Being a Traitorous Scum
Or: How to get the AI lynched; How to call the shuttle as Atmos' Tech, step-by-step:
- Open valves connected to harmful gas you want to add to the station.
- Set pumps to the distribution loop to maximum pressure output (4500 kPa).
- Set filters to not filter harmful gasses you want to add to the station OR set the waste-in pump to 0 kPa (but leave it on to confuse the crew).
- Open valve from custom mix chamber.
- Turn on pump leading to distribution loop.
- Wait for vents to slowly kick out your deathgas mix as regular atmos' drains out through the inevitable hull breaches (alternatively turn off pressure checks on air alarms' vents to speed things up).
- If you need to kill someone for your objective, and you want to be more proactive, the Fire Axe mounted in the wall is surprisingly effective. Just don't leave it lying around, because it's one of only two on the station.
To hurry this process up, you can set the air vents at local control panels to maximum output pressure. Not doing so gives the AI and Atmos Techs more time to notice what you've done and shut it off before it takes effect.
A faster process for achieving the same result is to do the following:
- Disconnect, change the direction of, and reconnect the pump that feeds from the air mix to the mix tank in the north-eastern room of atmosia.
- Open the valves for your deathgas mixture of choice.
- Power on and max the pressure on every pump in the mix pipes (yellow pipes) from the storage tanks out to the station output (blue pipes).
This simply means that instead of the air mix being put into the mix tank as it normally does, the air mix (which may or may not contain death gasses) is fed into the station output.
Crafty atmos' traitors will want to cut cameras, replace pumps with pipes, use tricky pipe configurations to avoid the AI interfering or the detective trying to fix it and make a hole in the station's oxygen and air tanks, venting the entire round's supply of oxygen into space.
An extremely fast method that involves a clever use of the waste system is the following:
- Reconfigure the piping to connect the waste system directly into the pure pipes.
- Find a place with a waste pipe next to a distro pipe, then configure them so that they can be united later.
- Open the valves for your deathgas mixture of choice, the waste piping should now begin to fill with your gases.
- Disable the vent limits on every air alarm you can find.
- When ready, go back to your distro/waste pipe spot and unite them.
- Listen to screams over the radio.
Your powers don't extend to just messing with the station's air. High level gas synthesis is a valid option and can grant you some crafty gasses and items to aid you in devious acts:
- Nitrium is immediately the most obvious choice for brute force combat scenarios. Speed is incredibly strong and rare to see outside a few sources like chemistry or genetics. It also prevents you from sleeping so it can be combined with Healium for passive healing.
- Healium has a strong healing effect but quickly puts you to sleep if you're breathing it. Perhaps you can find a way to stay awake while breathing it. Or you could use it as a stronger N2O to gas crowds of people with. It also sells at Cargo really well for how relatively simple it is to make, if you want to make use of what Cargo has to offer.
- Tritium is notorious for creating roaring fires and can quickly send the crew into a panic if spread in large quantities. It doesn't take a genius to figure out where large amounts of tritium come from though, so expect unhappy visitors in atmospherics.
- Water Vapor, a side product from tritium fires, can be collected in canisters to unleash in the halls as a sort of water bomb to make everything slippery. Consider an investment into no-slip shoes.
- Freon can make things very chilly very fast, and combined with Water Vapor can create super slippery frozen tiles that send those who slip flying down the hall.
- Pluoxium isn't incredibly useful for traitorous activities, but a full tank of it can let you camp out in space for a VERY long time if needed.
- Zauker is... well, pretty bad for gassing places since it just turns into air when it comes into contact with nitrogen. However, a dedicated sealed chamber of it could be incredibly lethal for anyone stuck inside. Another idea is replacing the emergency tanks around the station with ones filled with pure Zauker, so that the next unfortunate soul who needs air gets nigh instantly killed upon turning on their internals. Consider sneaking these into people's pockets...
- Hot Ice can be best described as pocket sized plasmafires. Much easier to target specific areas compared to plasmaflooding distro or dragging a big obvious canister of the stuff in. Ignite in hand while wearing your firesuit and drag any victims in to your new hellfire.
- N2O crystals can be configured like grenades to detonate instantly like other grenades. Meaning, you could just walk up to someone and almost instantly put them to sleep by detonating N2O in their face, assuming they aren't using their internals.
- Hyper-Noblium crystals can pressure proof your gear, allowing immunity to pressure hazards and removes the need for a hardsuit to spacewalk. Increasing survivability and mobility is always a plus.
- Metallic Hydrogen and its products are somewhat underwhelming but not to be forgotten. Elder Atmosian armor isn't great compared to some other options, but it does protect the limbs unlike a normal armor vest which is something to note. Metallic Hydrogen fireaxes are identical to normal fireaxes in function except for doing exactly one (1) less brute damage. Why? Fuck you, that's why. With 20 bars of your hard-earned metallic hydrogen you can create a golem shell to make your own minions. Metal Hydrogen golems are immune to magic, flashes, heat and fire, but lose the cold and space immunity that all the other golems have. You'll never match xenobiology in the number of golems you can create, but it's a nice option to have a golem bro help you in your deeds.
Other antagonistic things to do:
- You can hack an air alarm to use it as a non-Atmos Tech.
- You can remove the digital valves to shut down AI control, or disable the cameras if you know there are no Cyborgs on the station.
- Using a gas filter turned on to pour large, ever increasing, amounts of gas onto a single connector port has no visible effects, but if you wrench a canister onto it then the canister will almost immediately fill up with the massive pressure buildup, letting you get super-high-pressure plasma/CO2/etc canisters to hit areas with.
- You can make a powerful single-tank bomb assembly gas mix by pumping in 2553kPa of plasma heated to 698.15 Kelvin into an empty handheld oxygen tank (not the small emergency ones).

